Mac 512K to Linux Netatalk Server
The Mac 512K was a technological marvel in its day, but if you have one today you may find it frustratingly limited. It can only read 400K floppies (which can't be created from modern hardware) and it has no internal hard drive. It doesn't have an Ethernet port, nor an expansion slot to add one.
Fortunately, there is a way to connect the Mac 512K, 512Ke, and other classic Macs via AppleShare to a modern network file server. This gives the old Macs access to a virtually unlimited library of software.
If your Macintosh has Ethernet, you may want to skip to setting up the Linux netatalk server.
What You'll Need
AppleShare Workstation 1.1 400K Floppy
Although it says "installer", this is a bootable System 3.3 floppy with AppleShare client functionality.
400K MFS disk image
You might be able to make your own 400K MFS floppy using an old Mac and Disk Copy 4.2. I lacked a suitably old Mac, so found someone on eBay that could make the disk for me.
NOTE: This floppy is only required for the Mac 512K; most other classic Macs have AppleShare included with their System Software / Mac OS installation. The Mac 512Ke can use this floppy, or it can use an 800K System 6.0.8 boot floppy that includes AppleShare 2.0.2.
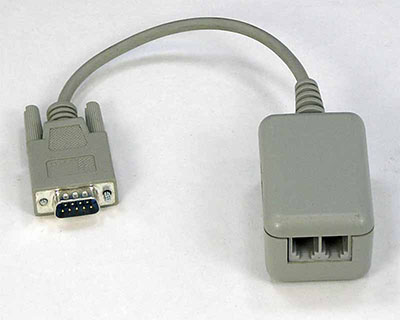
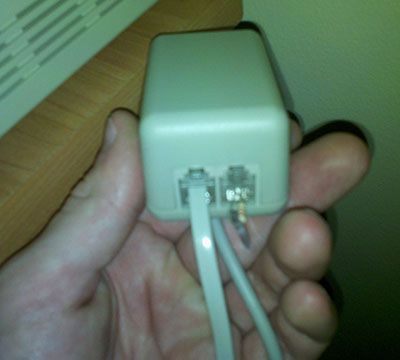
DB9 LocalTalk PhoneNet Adapter
RJ11 PhoneNet Terminator
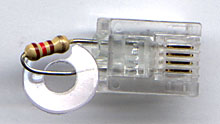
This terminator comes with most PhoneNet adapters.
RJ11 4-pin Phone Cable
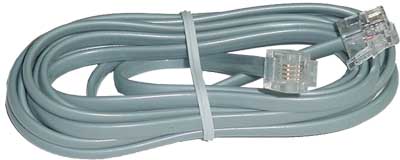
Make sure all 4 pins are connected straight-through. 6-pin wire also should work.
LocalTalk to Ethernet Bridge
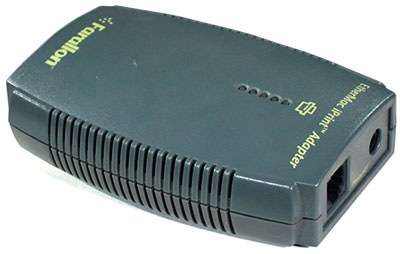
The Farallon EtherMac iPrint Adapter works perfectly for bridging AppleShare from LocalTalk to Ethernet.
Netatalk 2.2.3 with DDP Support Enabled
Most Linux distributions include some version of Netatalk in their package management, but you specifically need Netatalk 2.2.3 with DDP (EtherTalk) support enabled.
Slackware Linux 14.1 includes Netatalk 2.2.3 with DDP support. You can install it via:
sudo slackpkg install netatalk
NOTE: Netatalk 3.x does not support EtherTalk. Netatalk 2.2.5 should work in theory, but when I tried it the shared volumes didn't show up on the Mac 512K. So, if your distro does not include Netatalk 2.2.3, you'll need to install it yourself. If you build it from source, make sure you include DDP EtherTalk support and the ability to use Linux login passwords (/etc/shadow), like so:
./configure --enable-ddp --with-shadow
make
sudo make install
I've also heard that Netatalk 2.1.6 works, so try that if you have issues with 2.2.3.
NOTE: As of 2019, Slackware now installs netatalk 3.1, which is not compatible with older Macs. If you have netatalk 2.2.3 installed in Slackware, I recommend adding netatalk to /etc/slackpkg/blacklist to avoid updating to version 3.
Hardware Installation
Connect the PhoneNet adapter's DB9 end to the Mac 512K printer port.
NOTE: System 3.3 does not look for LocalTalk on the modem port!
Insert the RJ11 terminator into one of the PhoneNet adapter's ports.
Connect the RJ11 4-pin cable from the other PhoneNet port to the LocalTalk to Ethernet bridge.
Connect an Ethernet patch cable from the LocalTalk to Ethernet bridge to your LAN switch.
NOTE: If you don't use a switch/hub, you'll need a cross-over Ethernet cable between the bridge and your server.
Connect the power adapter to the LocalTalk to Ethernet bridge.
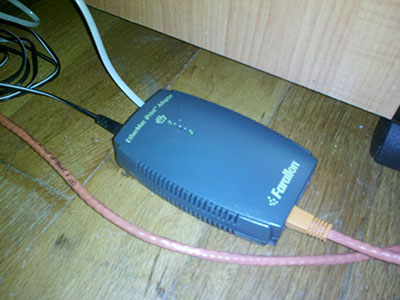
If you're using the Farallon EtherMac iPrint, you should now see green lights at each end of its LED strip. (The LocalTalk end may briefly flash red when you first connect the power.)
Linux Netatalk Configuration
Everything you need to configure is under /etc/netatalk. You'll need root permission to edit these files.
atalkd.conf
This file defines parameters for AppleTalk-over-Ethernet (EtherTalk). It should just be a bunch of comments by default.
Add a single line at the end to specify which network interface to use, such as eth0 for a typical LAN interface, or br0 if your LAN ports are bridged:
eth0
The first time you start Netatalk, the line will automatically get filled with AppleTalk settings:
eth0 -phase 2 -net 0-65534 -addr 65280.62
You shouldn't need to mess with these settings manually.
NOTE: If you use a bridge, make sure it exists before rc.atalk is started; otherwise, this will reset to eth0.
afpd.conf
This file defines which transports to use for AFP. Like atalkd.conf, it's the last line that counts.
The leading dash simply means use the hostname defined in netatalk.conf. We want to use both AppleShare IP (for modern Macs) and EtherTalk (for the bridge to the Mac 512K), so we specify -transall to enable both transports. For TCP/IP access, you may need to use -ipaddr to specify which IP address to listen from; put the Linux server's LAN IP here.
- -transall -ipaddr 10.0.0.2 -mimic RackMac
You could optionally specify user authentication modules here, but we'll do it in netatalk.conf instead.
netatalk.conf
This is the big configuration file for Netatalk. You'll want to set a few things here.
The ATALK_NAME specifies what will show up in the Chooser:
ATALK_NAME=Linux-AppleShare
The AFPD_MAX_CLIENTS can be set to whatever number you want, but make sure it's not commented-out:
AFPD_MAX_CLIENTS=32
The AFPD_UAMLIST defines the methods of authentication that are available. We use uams_passwd.so (plaintext) for the Mac 512K, and uams_dhx2_passwd.so for encrypted password communication with modern Macs:
AFPD_UAMLIST="-U uams_passwd.so,uams_dhx2_passwd.so"
IMPORTANT: The examples listed in the file's comments might be wrong! Your username/password will be rejected if the module is not found. You should check for yourself to see the exact names of the authentication modules available on your system:
$ ls -l /etc/netatalk/uams
total 80
-rwxr-xr-x 1 root root 1061 Sep 11 2012 uams_dhx2_passwd.la
-rwxr-xr-x 1 root root 12896 Sep 11 2012 uams_dhx2_passwd.so
-rwxr-xr-x 1 root root 1013 Sep 11 2012 uams_dhx_passwd.la
-rwxr-xr-x 1 root root 9328 Sep 11 2012 uams_dhx_passwd.so
-rwxr-xr-x 1 root root 953 Sep 11 2012 uams_guest.la
-rwxr-xr-x 1 root root 7088 Sep 11 2012 uams_guest.so
-rwxr-xr-x 1 root root 967 Sep 11 2012 uams_passwd.la
-rwxr-xr-x 1 root root 9184 Sep 11 2012 uams_passwd.so
-rwxr-xr-x 1 root root 987 Sep 11 2012 uams_randnum.la
-rwxr-xr-x 1 root root 12240 Sep 11 2012 uams_randnum.so
If you enable uams_guest.so above, use AFPD_GUEST to select a Linux user for guest access:
AFPD_GUEST=guest
We need to enable ATALKD_RUN, but none of the other legacy AppleTalk daemons:
ATALKD_RUN=yes
#PAPD_RUN=no
#TIMELORD_RUN=no
#A2BOOT_RUN=no
NOTE: Netatalk takes about 20 seconds to start. If you don't want to wait, you can configure it to start in the background, but I don't recommend doing this until you've made sure everything is working correctly:
ATALK_BGROUND=yes
AppleVolumes.default
This file defines the shared directories. Like most Netatalk config files, the top is a large block of comments. Leave the default options:upriv,usedots enabled:
# The line below sets some DEFAULT, starting with Netatalk 2.1.
:DEFAULT: options:upriv,usedots
But I recommend disabling the default home directory shares:
# The "~" below indicates that Home directories are visible by default.
# If you do not wish to have people accessing their Home directories,
# please put a pound sign in front of the tilde or delete it.
#~
Then we specify our shared folders. If you want to write files from the 512K, set volsizelimit:63 to limit each share to 63MB, because Netatalk seems to incorrectly report volume sizes larger than 63MB to System 6 and older; your Mac 512K will show "0K available" and treat the volume as full.
/srv/appletalk/games Games volsizelimit:63
/srv/appletalk/apps Apps volsizelimit:63
NOTE: If you want a larger volume to write to from System 7 on a newer Mac, try volsizelimit:2047 (<2GB).
SIDE NOTE: While we're at it, if you also want to host Time Machine for Mac OS X clients, add one more share with options:tm enabled:
/srv/appletalk/timemachine TimeMachine options:tm allowed_hosts:10.0.0.0/24 volsizelimit:1048576
Create Shared File Directories
Create the directories we described in AppleVolumes.default, and grant full access permissions:
mkdir -p /srv/appletalk/games
mkdir -p /srv/appletalk/apps
sudo chmod 777 /srv/appletalk/*
Start the Netatalk Service
Depending on your Linux distribution, you may need to make rc.atalk executable first:
sudo chmod +x /etc/rc.d/rc.atalk
Start Netatalk using rc.atalk (as root):
sudo /etc/rc.d/rc.atalk start
Access the Share
Make sure your hardware is all connected prior to booting the Mac 512K. The LocalTalk to Ethernet bridge must be powered up before the Mac.
Move the plastic tab on the AppleShare Workstation 1.1 floppy to the read/write position (cover the hole). System 3.3 cannot activate AppleShare without writing to the System Folder.
Boot the Mac 512K from the AppleShare Workstation 1.1 floppy disk.
Select the Chooser from the Apple menu.
Click AppleShare on the left, and allow it to turn AppleTalk on if it is not already. Select your Linux server from the list, type your Linux username into the box, and click OK.
It will ask you for a username and password; again use your Linux username and enter the password for it.
NOTE: It should say "plaintext" next to the password box, indicating the use of uams_passwd.so on the Netatalk server. If it says "scrambled" next to the password box and your login fails, make sure you're not using uams_randnum.so in netatalk.conf or afpd.conf.
Select a volume to mount and click OK. In my experience, you cannot use the checkboxes to automatically mount volumes at startup; it will give an error about AppleShare Prep if you try.
All volumes will show 0K in disk, but that's not actually true. They will report the volume's maximum size as the available space, unless the volume is 64MB or larger, in which case it will report 0K available.